Hello again,
I realized the other day that I am working on projects as I remember I'm doing them and I think that means I need to do a little goal setting. It may be that some of these don't happen, but these are my somewhat ambitious goals for this blog for the next few months.
#1) Finish E's Space Invaders quilt (and, of course, show you the whole process)
#2) Finish the clothes quilt for my bed (this one is the one that might get bumped)
#3) Buy my first pattern and make myself something I can actually wear. I'm short on work clothes, so I think this will probably be something totally boring and practical. (Though super exciting for me if I succeed!)
#4) Find a pattern I like and make my first pencil skirt. Then make a whole bunch more. (Remember that thing about needing work clothes?)
#5) Do something about the masses of too-big T-shirts in my life. I have a whole drawer of these that I want to try to fix or alter or turn into something else.
#6) Make Casey a dog bed as pretty as he is. It's going to be in my living room. I would like it not to be ugly! My puppy is so pretty - he should have a dog bed that does him justice.
I think those are pretty adequate goals for the next 3 months. I suspect that quilting those two quilts will be the thing that breaks me.
We'll see how that goes! I have ideas and I'm scheming at least. I'm always happy when I'm scheming! :)
Till next time,
A
Monday, October 29, 2012
Friday, October 26, 2012
Making a Bar: Part 2
Hello again,
When I left you last time, we had just stripped, sanded, and primed a dresser and gone off to procrastinate with beer and video games.
Painted white, the dresser was actually quite pretty and there was some discussion of really making it white. White, however, would not go very well with the rest of my decor and in a house with two dogs, would probably only be white for about a week.
We spent awhile going through the colors in my apartment, because I am horribly indecisive about color. That might explain why my walls are still white even though I've lived in this apartment for two years....


I was not a huge fan of the black and Q was not a huge fan of the blue for this piece. We thought the grey would be incredibly hard to get right and so discarded it. I might do a rubbed blue when I find something to put the TV on. (That's another story all together!)
That left us with a nice, rich red, which I loved the idea of. We decided to go fairly dark and try for a somewhat shiny finish.
That was all well and good, but then I went to my local hardware store and made this mistake of telling the guy who was at the paint counter what I was going to do with the paint. He decided that since it was going to be a bar, I should use deck paint, which he said would be the same consistency, but dry harder.
Now, one cool thing about the super-thin paint, Q was painting with a foam brush and it left lines in the paint that looked like wood grain. I think it took quite a bit of concentration, but she made it look like this piece was actually made of wood! All those spots where the laminate was damaged came out looking like knots in the wood. Awesome accident!

I had bought these fabulous knobs for the top drawer:

I love them. What? I'm Irish - the knot-like quality appealed to me.
I had planned to only put them on top drawers, but then I realized something important - the holes drilled for hardware on these were 96mm, which apparently doesn't give me lots of options. My local hardware stores had nothing and I am not a patient woman. I wanted it done now!
So I did something I thought was going to be a little odd. I put knobs down the front in both holes instead of wide handles. And, lo and behold, it looked fantastic!
I really thought that would look strange, but in the end, I absolutely love the double row.
And this is where just going for it benefits Q and me - I ended up loving the bright red too. I realized once I put it in place that it is exactly the same color as the roof I can see out my window and it is beautiful in that space. :)
Only problem - now it makes the rest of my furniture look shabby! Clearly, I need to step up my game in the rest of my house.
Once I really set it up and get glass shelves to go above it, I will post again about the first finished corner of my house. For the moment, I just keep stepping back to admire it. :D
So once again, before and after:


Hope you love it as much as I do!
Till next time,
A
When I left you last time, we had just stripped, sanded, and primed a dresser and gone off to procrastinate with beer and video games.
Painted white, the dresser was actually quite pretty and there was some discussion of really making it white. White, however, would not go very well with the rest of my decor and in a house with two dogs, would probably only be white for about a week.
We spent awhile going through the colors in my apartment, because I am horribly indecisive about color. That might explain why my walls are still white even though I've lived in this apartment for two years....

As you can see, most of them were pretty dark and solid. This piece is going in a corner all by itself and I want it to stand out as a strong piece.
That seemed totally fine until I got home and discovered that he had given me concrete floor paint instead, which is not the same consistency. It's more like stain. But, of course, we didn't quite realize that until we had already started and the hardware store was closed. Sooo...we did what Q and I usually do and went for it anyway.
I wish I had taken pictures of the colors as it evolved, but sadly I did not. Coat one - coral pink. That's right, really, really pink. For those of you who know me, you will understand why this required a drink. I do not do pink! The second coat was a kindof magenta-like pale red color that I couldn't describe accurately.
The third coat, however, started to look red. Like fire engine red. Or maybe cherry red. At this point, it was 2am and we decided it was time to go to bed and see what it looked like in the morning. Sadly, Q's flight was in the morning, so she didn't get to really see the finished product.

Once it dried, it looked awesome!

I really thought that would look strange, but in the end, I absolutely love the double row.
And this is where just going for it benefits Q and me - I ended up loving the bright red too. I realized once I put it in place that it is exactly the same color as the roof I can see out my window and it is beautiful in that space. :)
Only problem - now it makes the rest of my furniture look shabby! Clearly, I need to step up my game in the rest of my house.
Once I really set it up and get glass shelves to go above it, I will post again about the first finished corner of my house. For the moment, I just keep stepping back to admire it. :D
So once again, before and after:


Till next time,
A
Wednesday, October 24, 2012
Making a Bar: Part 1
Hello again,
Apologies for the break in broadcasting. My best friend Q was in town and we did a big project that took over the quilt making time. So rather than the usual, here is the project we worked on in two parts.
I recently found out I didn't get an apartment I wanted that was much bigger than mine, so Q kindly decided to help me start fixing my house to make me feel better about this. And now, I have plans! Lots and lots of plans. :)
Step 1: replace my weird kitchen cart in the corner of the living room with a functional bar that I can really use. And Q had an awesome idea - take the icky dresser I got for free that is not really being used in the bedroom and turn it into a bar. Brilliant! And, because the universe smiled on me, it fit perfectly - like 1/32 of an inch perfectly.
Only problem? It looked like this:
So Q had the awesome idea of stripping and painting this thing a color that I would love and making it a bar. Brilliant, obviously!
While she was visiting, she decided to start stripping it. Now, we didn't actually realize this thing was not going to be easy. It was made of laminate and had been painted with one of those special, unpleasant primers that makes paint stick to laminate. Yeah, it looked simple to strip in the beginning:

Now, Q knows what she's doing. Since I had two dogs in the house, we were using the indoor-safe primer, but she's used it many times before. Our supplies were:

Finally, we got it stripped after delivered pizza and a fair amount of beer...

Yeah, it looks awful, doesn't it? And there were places where we just couldn't scrape the paint off, so we had to do way more sanding than expected. Those little curves on the drawers? They make it really pretty, but they are also annoying as all get out to strip and sand.
However, with more beer and more pizza, we got it all ready to be primed and it started to look like a real piece of furniture finally!

Once it was all primed and looking like a real piece of furniture again, we took a night off and played video games....
Hooray for high scores in all the version of Pac Man and Qix and Space Invaders and Galaga. That's right... We are video game queens! :) (If you live in DC, the bar that has all of these is the Board Room on Connecticut, by the way. It's awesome!)
Part Two coming up, where we have some problems with paint, color confusion, and a beautiful finished product!
Till next time,
A
Apologies for the break in broadcasting. My best friend Q was in town and we did a big project that took over the quilt making time. So rather than the usual, here is the project we worked on in two parts.
I recently found out I didn't get an apartment I wanted that was much bigger than mine, so Q kindly decided to help me start fixing my house to make me feel better about this. And now, I have plans! Lots and lots of plans. :)
Step 1: replace my weird kitchen cart in the corner of the living room with a functional bar that I can really use. And Q had an awesome idea - take the icky dresser I got for free that is not really being used in the bedroom and turn it into a bar. Brilliant! And, because the universe smiled on me, it fit perfectly - like 1/32 of an inch perfectly.
Only problem? It looked like this:
Yeah, the starfish and pale blue do not work in my living room. Also, those handles slide back into the dresser really easily and that is frustrating.

So.... Apparently laminate with primer on it is made of evil. Pure, un-remediated evil. Q started the stripping while I was at work around 2 in the afternoon. She was still going when I got home at 6 and started to help.

Really - it didn't look like it was going to a combined 14 hours of labor to strip! It really, really didn't.


Now isn't that prettier?
A
Monday, October 15, 2012
Space Invaders Quilt: Cutting Endlessly
Hello again,
Well, I have finally started cutting squares for the Space Invaders Quilt! I was having some difficulty getting even strips to do mass cutting, so I took my mother's suggestion and stopped trying to be efficient. "Accuracy over efficiency, dear." was the comment, I believe!
I pulled out my materials and started with purple, since it was on top.

I cut 40 squares in a few hours, which was way faster than I expected and then I had to stand back and admire my handiwork....

And.... Then I cleaned my house, because my arm hurt. :P
When I stopped avoiding finishing my task, I came back and cut another 40 squares. Then, shockingly, I was done! I'm still a little amazed that I cut 80 squares in a day!
I also realized that somehow, my math on how much fabric I would need was off by about a factor of 5. I have 2 yards of this fabric and I used less than half a yard. It's a pretty purple though, so I will just use it in something in future!
Hooray for having a fabric stash!
Till next time (when I get to cut 80 blue squares and about 100 black sqaures.),
A
Update: After looking at my pattern again, I realized that I am very silly and cut way more squares than was necessary. Anyone have another child who should get one of these? I'm pretty sure I doubled all the numbers!
Well, I have finally started cutting squares for the Space Invaders Quilt! I was having some difficulty getting even strips to do mass cutting, so I took my mother's suggestion and stopped trying to be efficient. "Accuracy over efficiency, dear." was the comment, I believe!
I pulled out my materials and started with purple, since it was on top.

As you can see, I finally cleaned my table to make this easier!
Once I started cutting, I'm pretty sure I cut for about 4 hours straight. I needed a feeling of accomplishment. And I most definitely got it! I discovered that once I cut a straight line on the bottom, I could just line up the template and only cut two sides of it to have a square. Sometimes I messed up and there was more cutting involved, but at least I'm confident my squares are all 3.5" and will not do anything odd when I go to piece them together.
A very nice commenter told me about strip piecing (Thank StephC!) and I think for the next quilt I will definitley use that. I'm feeling a little uncertain about getting the strips right on this quilt. I'm hoping I get the hang of cutting nice, straight strips soon, because that would be really useful for my next quilt!
I cut 40 squares in a few hours, which was way faster than I expected and then I had to stand back and admire my handiwork....

And.... Then I cleaned my house, because my arm hurt. :P
When I stopped avoiding finishing my task, I came back and cut another 40 squares. Then, shockingly, I was done! I'm still a little amazed that I cut 80 squares in a day!
I also realized that somehow, my math on how much fabric I would need was off by about a factor of 5. I have 2 yards of this fabric and I used less than half a yard. It's a pretty purple though, so I will just use it in something in future!
Hooray for having a fabric stash!
Till next time (when I get to cut 80 blue squares and about 100 black sqaures.),
A
Update: After looking at my pattern again, I realized that I am very silly and cut way more squares than was necessary. Anyone have another child who should get one of these? I'm pretty sure I doubled all the numbers!
Friday, October 12, 2012
Space Indavers Quilt: Fabric
Hello again,
Since the plans for the quilt are now complete, it is time to talk fabric. I have no real idea what I'm doing, so I decided to go with all quilting cotton of the same type. I was worried that they would match up strangely or wear differently over time otherwise. I needed solid colors, which surprisingly hard to find in quilting cotton in the right colors. I also need black, which is turning out to be a trial - but more on that later!
I went online with a general idea of the colors I needed and found fabric.com, which had Kona Quilting Cotton in a pretty wide range of colors. I ordered the three that I thought would work best and they finally came! (Who knew getting fabric in the mail would make me giddy!)
So I got these three:

Since, as always, these were taken at night with a flash, the colors are a tiny bit off. That one on the end that looks black? Yeah, it's not black - it's a very dark brown. Now, it's a pretty color and all, but it is not going to work for this quilt. Space Invaders absolutely must have a really dark, black background! I like the color, so I'll keep it anyway and use it in something else someday - an excuse for more sewing. :)
I knew I had to pre-shrink fabric, but I had no idea what I was doing, so I found this awesome post on Gertie's Blog for Better Sewing. I just threw mine in the washer with some dark sheets and dried like I usually do.
Only thing I forgot? Those instructions on serging or zigzagging the edge? Those are a good idea! My edges look like this in the good spots:

It took forever to iron all of these and I learned a couple of things:
1) My little tiny ironing board is not going to work for quilting. I need to buy a full-sized one.
2) The fact that my iron has no auto-shutoff makes me nervous and is annoying cause I keep having to unplug it.
3) Steam. Steam is really important. Why didn't I know this? Apparently, I'm just kind of a slob who never irons things. (Sorry Mom!) I had to iron everything twice, because this first time did not take without steam!
4) When I put my iron down, it hisses out a little cloud of steam. This should NOT be pointed at my own arm, my dog, my wall, or my table. Obvious? Why yes, yes it kind of is. Now.
So, 4 hours later, I have fabric ready for cutting! And a sore arm from ironing for hours.
Next up: Finding truly black fabric and cutting quilt squares, both of which may take awhile. But I'm having so much fun, I really don't care.
Till next time,
A
Since the plans for the quilt are now complete, it is time to talk fabric. I have no real idea what I'm doing, so I decided to go with all quilting cotton of the same type. I was worried that they would match up strangely or wear differently over time otherwise. I needed solid colors, which surprisingly hard to find in quilting cotton in the right colors. I also need black, which is turning out to be a trial - but more on that later!
I went online with a general idea of the colors I needed and found fabric.com, which had Kona Quilting Cotton in a pretty wide range of colors. I ordered the three that I thought would work best and they finally came! (Who knew getting fabric in the mail would make me giddy!)
So I got these three:

Since, as always, these were taken at night with a flash, the colors are a tiny bit off. That one on the end that looks black? Yeah, it's not black - it's a very dark brown. Now, it's a pretty color and all, but it is not going to work for this quilt. Space Invaders absolutely must have a really dark, black background! I like the color, so I'll keep it anyway and use it in something else someday - an excuse for more sewing. :)
I knew I had to pre-shrink fabric, but I had no idea what I was doing, so I found this awesome post on Gertie's Blog for Better Sewing. I just threw mine in the washer with some dark sheets and dried like I usually do.
Only thing I forgot? Those instructions on serging or zigzagging the edge? Those are a good idea! My edges look like this in the good spots:

Not a big deal, but it mean that I had a ton of clipping frayed threads to do! Yes, yes I do now have a million purple and blue threads all over my house... And a long-haired black dog. Who is (of course) now finding every loose thread and getting it tangled in his hair. But hey, he loves being brushed, so it's his latest excuse to get groomed every night!
1) My little tiny ironing board is not going to work for quilting. I need to buy a full-sized one.
2) The fact that my iron has no auto-shutoff makes me nervous and is annoying cause I keep having to unplug it.
So, 4 hours later, I have fabric ready for cutting! And a sore arm from ironing for hours.
Next up: Finding truly black fabric and cutting quilt squares, both of which may take awhile. But I'm having so much fun, I really don't care.
A
Wednesday, October 10, 2012
Old Clothes Quilt #1
Hello Again,
Since my first quilt square, I have decided I need more practice at this
before I take on the Space Invaders Quilt. Since that one is a gift, I need it
to come out right! Practice seemed like
a good idea. Since the dogs have been
slowly destroying the pretty quilt on my bed, I thought I would make something
for myself first. At least then it
doesn't matter if it's a little off.
Like with people, a few imperfections make quilts interesting, right?
Since I've lost a ton of weight, I have many, many clothes that no longer
fit. Some of them are good for donation,
but others have stains or tears that would make me feel bad sending them to
Good Will. I decided to pull those out
and see if any of them were fabric that would work for a quilt and, happily,
some of them are!
I
pulled apart a shirt and two pairs of pants that had tears at the hem and ended
up with these:
That one in the middle is a dark blue, not black as it looks. Again, this would work better if I ever took
these pictures when the sun was up!
I cut several quilt squares of each and got my pinning, sewing, and seam
pressing process on. I wanted to do some experimenting
before I went all-out making millions of squares!
I ended up with some very pretty quilt squares, including the first one I made a few days ago:

From a distance, these look awesome. I think the quilt is going to end up
being really pretty! It's the right
colors for my bedroom right now too - I have a thing for blue clearly.
While I love these and will use them in the quilt, there are
some...um...issues to work out in my quilt square-making skills.
I had some trouble getting the squares to line up right, which I think is
mostly due to not perfectly cut squares.
I think? Having the seams not perfect on the first batch led to problems
later on and some of the squares look like this if you look closely:

In some ways, I think it kinda looks cool, since all 4 corners were off by
about the same amount on that one, but I need to figure out what I did wrong so
I don't do it on the Space Invaders Quilt!
It looks fine overall:

OK, yes, that one seam is off still, but I honestly don't think I will
notice it once it's in a big quilt. Probably other people are not crazy perfectionists like me. And I would be a little creeped out if someone spent enough time staring at my bed to notice a few off corners on the quilt, come to think of it.
In the end, I think I will end up doing a 60" x 80" quilt with these. I think I can just do 5 across with 6" strips
in between (makes each square a good) and it will look pretty. It will need to be white or blue to go with
the blue/grey/white theme I have going at the moment, but that shouldn't be
hard to find.
I already have 4 squares, so it's almost a row! I have begun cutting individual squares with
my template instead of strips, since it seems to work better. (There must be a trick to cutting perfect
strips, but I haven't figured it out yet. Gotta work on that!) So look for more quilt squares to come in
future. I think this is going to be
awesome when it's done.
Till next time,
A
Monday, October 8, 2012
Space Invaders Quilt: Planning
Hello again!
It looks like I might actually be able to post often enough to make this blog a thing for me. I'm not sure I'm terribly worried if anyone other than my Mom and Grandma read it, since really I started putting crafts up here so they could see them. Perhaps someday it will entertain someone else too!
As I said in my last post, the real purpose of getting my sewing machine was to try to make a baby quilt for my friend E. We chatted about designs that she would love and things I thought I would be able to do with my limited machine sewing experience. We are both complete geeks and love old video games, as does her husband. I thought and thought and hunted around through the crafty blogs and I just wasn't seeing quite what I wanted.
Then I had a brain flash: Space Invaders! Eight bit games are totally easy to make into quilts because they are already just blocks. And Space Invaders is the ultimate original geek game. I talked to E. and she loved the idea as much as I did. She said her husband even did a little happy dance when she told what I wanted to do.
I should probably have been more intimidated by designing my own pattern, but it doesn't seem that different from designing cross stitch patterns, which I do all the time. I spent a ton of time sketching out characters on graph paper and then remembered that I have the magic power of technology.


Excel is awesome for doing cross stitch patterns, so why not quilts too? I can make that work! I just select all and set each column and row to 20 pixels, so I have totally perfect, even squares to work with. I redid the characters in there and it was all much easier to plan! It took quite awhile to choose which characters I wanted to use. There are actually four characters, but I could not figure out how to fit all of them on a baby quilt without having to use 1" or 2" squares and that sounded like a lot of really small sewing!
It took awhile, but I decided these two were the cutest:

I spent days playing with different ideas and arrangements and sizes. I thought about doing smaller characters and laying them out like the game itself, but I realized it would a) take for ever and b) be likely beyond my skill set.
After days of playing around, I decided on doing two large characters and making the quilt slightly larger than a normal crib quilt. In the end, I ended up with this fantastic design that I am completely excited to make.
With the grid of where the squares will be:

I pulled out the grid, so I could see what it would look like and be sure I was really happy with it. I have no idea how I'm going to quilt this so that it still looks like Space Invaders, but I will find a way!

Now - to get the many, many squares cut and measured, so I can get moving before E's daughter makes it to 6 months!
Wish me luck.
A
Friday, October 5, 2012
Project Three: First Quilt Square
Hello again!
I realized that no matter how many amazing projects I want to try from the crafty blogs, I did actually buy this sewing machine for a purpose. I promised a friend of mine who was having a baby that I would make her a baby quilt. (I say was having because I am so behind that she has now had said baby!) Since that's the plan, I needed to get on the learning to make quilts part!
I decided to use some of the fabric Mom so generously brought me on her visit and see if I could make a very basic quilt square. The quilt I have planned for E. is all squares, so I have already bought a 3.5" square template.

I had some trouble getting 3.5" strips to be even, maybe because my cutting mat isn't that big? I need to work on that! There is a LOT of cutting in my near future. Either way, I did manage to get a bunch of squares out of the fabric eventually.

I laid them out in a grid on the cutting mat, so I could see how it would look in fabric and not just in my head.

Once I decided I liked the layout, I started pinning everything together as instructed by my little sewing manual. And yes, today's lesson is that pins are sharp! Who knew? :P
It took a surprising amount of time to get everything pinned so nothing buckled and everything lined up right. (I forgot to take a picture of the first pinning set. I sewed the first batch of pairs together and then did this part.)

One I had everything pinned, I sewed the 1/4" seams and I am very proud that they are pretty much straight! They're not perfect, but I have no illusions about my beginner status with getting really straight seams.
Then I had these three sets of squares and I pressed the seams so they would all lay flat. Is there a direction you're supposed to press seams? I pressed mine so the edge faced left for some reason, but then I realized I didn't know if there was a right way to do that part.

Once I won the fight with my iron and got all the seams pressed, I pinned one set together, sewed it and pinned the next. I am getting better at the seams - these are closer to straight! (I am so proud of myself.)

And then, all of a sudden and much faster than I expected, I had a quilt square! It's so pretty. :)

This only took me about an hour and half from beginning to end. I honestly thought it would take me much, much longer. Apparently, I'm cooler than I think? Haha, or this is easier than I think!
I actually love the way this looks. I think I might find a similar fabric and make a quilt for my bed that's just very simply squares alternated like this. It's basic, but somehow I like the look more in person than I do when I lay it out as an idea.
Next up: Learning to cut straight strips, so I can start cutting for E's quilt! It's going to be SO cool when I'm done.
Wish me luck,
A
I realized that no matter how many amazing projects I want to try from the crafty blogs, I did actually buy this sewing machine for a purpose. I promised a friend of mine who was having a baby that I would make her a baby quilt. (I say was having because I am so behind that she has now had said baby!) Since that's the plan, I needed to get on the learning to make quilts part!
I decided to use some of the fabric Mom so generously brought me on her visit and see if I could make a very basic quilt square. The quilt I have planned for E. is all squares, so I have already bought a 3.5" square template.


I laid them out in a grid on the cutting mat, so I could see how it would look in fabric and not just in my head.

Once I decided I liked the layout, I started pinning everything together as instructed by my little sewing manual. And yes, today's lesson is that pins are sharp! Who knew? :P
It took a surprising amount of time to get everything pinned so nothing buckled and everything lined up right. (I forgot to take a picture of the first pinning set. I sewed the first batch of pairs together and then did this part.)

One I had everything pinned, I sewed the 1/4" seams and I am very proud that they are pretty much straight! They're not perfect, but I have no illusions about my beginner status with getting really straight seams.
Then I had these three sets of squares and I pressed the seams so they would all lay flat. Is there a direction you're supposed to press seams? I pressed mine so the edge faced left for some reason, but then I realized I didn't know if there was a right way to do that part.

Once I won the fight with my iron and got all the seams pressed, I pinned one set together, sewed it and pinned the next. I am getting better at the seams - these are closer to straight! (I am so proud of myself.)

And then, all of a sudden and much faster than I expected, I had a quilt square! It's so pretty. :)

This only took me about an hour and half from beginning to end. I honestly thought it would take me much, much longer. Apparently, I'm cooler than I think? Haha, or this is easier than I think!
I actually love the way this looks. I think I might find a similar fabric and make a quilt for my bed that's just very simply squares alternated like this. It's basic, but somehow I like the look more in person than I do when I lay it out as an idea.
Next up: Learning to cut straight strips, so I can start cutting for E's quilt! It's going to be SO cool when I'm done.
Wish me luck,
A
Wednesday, October 3, 2012
Project Two - Success!
Well, I've had this vision in my head of a blanket I wanted to make for awhile now, but I wasn't willing to do all the embroidery by hand. There was a piece on Etsy of an airplane with just the loop line behind it that stuck in my head. I don't really have much space left on my walls for more art, so I wanted to do this instead.
I found a big piece of fleece on sale and it turned out to be the perfect size! 2 yards of 60" wide fabric makes a perfect blanket to curl up in on cooler nights. I had this plan of cleaning Sunday night, but the piece of fleece thrown over my chair was taunting me....

So instead of cleaning, I decided to make my first attempt at overlock stitching and see if I could make the blanket I could see in my head. I spent a good bit of time reading the manual to my machine and it looked pretty simple. I called Mom and asked if I could really just overlock stitch the edge of fleece and leave it. She said yes, so I went for it.
Trying to deal with the giant piece of fleece was...interesting....

I think I might need a bigger sewing table if I'm going to keep doing things like this! (Or at least somewhere else to put things like the manual, so I'm not pushing them to the side while doing the sewing part. OK - perhaps just some organizational skills would probably do the trick, but we're pretending.
I had the tension a little too tight (still getting the hang of that part...) and it made this awesome, slightly scalloped edge that I ended up loving.

It looks a little better on the large scale, but then you could see the dog toys shredded all over my floor!
I made a paper airplane and laid it out so I could see what the outline would look like. I drew it out on paper and messed with it until I liked the look

I really had intended to stop there for the night and clean up those shredded dog toys, but I was having so much fun I couldn't stop myself! . Then I killed the blade of my rotary cutter cutting around the template - silly me.

I had some white cotton I had grabbed for this purpose, though I hadn't really thought I'd use it so soon. I laid my template on top of the fabric and held it down with the ruler while I cut around it. I tried pinning it, but it made it hard to keep the ruler in place and made the fabric buckle a little too much. It worked in the end, but it involved a fair amount of cursing and impatience on my part!
Then I had a paper version and a fabric version. Hooray! I tried to rub the pencil lines onto the fabric, which was a total failure, so I just drew them on with a mechanical pencil and ran a straight stitch in black over them. It worked perfectly. :)
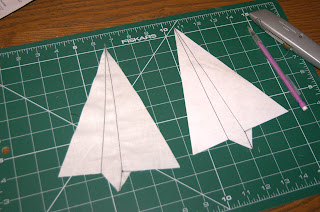
I think I did pretty well! The tip of the plane came out a little curved, but I actually liked that in the end. It made it look more like it was flying somehow.
I should have cut allowance to fold under the edges, but of course I didn't think of that until after I had gotten to this point. (Oops! Rookie mistake!) I decided to just go with it.
Once I had the plane cut, I needed to mark the line to sew in it's path on the blanket. I laid the whole thing out on my bed and used some white chalk to mark the line I wanted to sew. It sorta worked, I guess. Let's say it worked enough to do the sewing, but not so much that I would do it again. I need a better method to mark the line on fleece! Once I'd drawn in the line, I placed the airplane and stood back to make sure it looked like I wanted it to.
 (Please ignore the total disaster that is my house right now. I pulled everything out to organize it and it's not going well!)
I brought it back to the machine and got completely tangled up in the fleece trying to find the starting point of the line. The puppy thought this was hilarious and tried to make off with the blanket while I was fighting with it. (Thanks, Casey.)
I used a zigzag stitch 7mm across and made it fairly close together. I will confess the beginning of the line is a little funky, because I was messing with how close together the zigzag was. In the end, however, I got it right and it went pretty smoothly. I even used my machine on the high speed setting for the first time! I felt magic. And there were only a few moment when I panicked because I couldn't find the line too.

Once the line was done, I placed the plane and basted it down with dark thread. I used the white thread to applique around the edge. (Can I just mention that I LOVE my new sewing machine?!)
And then it was done!


And there we go - my second fully successful project. In fact, so successful one of my friends has asked me to make him a more manly version for his couch. Since my dog steals his blanket every time we come over, I think that seems only fair! I guess that gives me a chance to remember things like folded edges on the applique too. I am scheming presents for more people already....
But anyway, hooray success!
A
I found a big piece of fleece on sale and it turned out to be the perfect size! 2 yards of 60" wide fabric makes a perfect blanket to curl up in on cooler nights. I had this plan of cleaning Sunday night, but the piece of fleece thrown over my chair was taunting me....
So instead of cleaning, I decided to make my first attempt at overlock stitching and see if I could make the blanket I could see in my head. I spent a good bit of time reading the manual to my machine and it looked pretty simple. I called Mom and asked if I could really just overlock stitch the edge of fleece and leave it. She said yes, so I went for it.
Trying to deal with the giant piece of fleece was...interesting....
I think I might need a bigger sewing table if I'm going to keep doing things like this! (Or at least somewhere else to put things like the manual, so I'm not pushing them to the side while doing the sewing part. OK - perhaps just some organizational skills would probably do the trick, but we're pretending.
I had the tension a little too tight (still getting the hang of that part...) and it made this awesome, slightly scalloped edge that I ended up loving.
It looks a little better on the large scale, but then you could see the dog toys shredded all over my floor!
I made a paper airplane and laid it out so I could see what the outline would look like. I drew it out on paper and messed with it until I liked the look
I really had intended to stop there for the night and clean up those shredded dog toys, but I was having so much fun I couldn't stop myself! . Then I killed the blade of my rotary cutter cutting around the template - silly me.
I had some white cotton I had grabbed for this purpose, though I hadn't really thought I'd use it so soon. I laid my template on top of the fabric and held it down with the ruler while I cut around it. I tried pinning it, but it made it hard to keep the ruler in place and made the fabric buckle a little too much. It worked in the end, but it involved a fair amount of cursing and impatience on my part!
Then I had a paper version and a fabric version. Hooray! I tried to rub the pencil lines onto the fabric, which was a total failure, so I just drew them on with a mechanical pencil and ran a straight stitch in black over them. It worked perfectly. :)
I think I did pretty well! The tip of the plane came out a little curved, but I actually liked that in the end. It made it look more like it was flying somehow.
I should have cut allowance to fold under the edges, but of course I didn't think of that until after I had gotten to this point. (Oops! Rookie mistake!) I decided to just go with it.
Once I had the plane cut, I needed to mark the line to sew in it's path on the blanket. I laid the whole thing out on my bed and used some white chalk to mark the line I wanted to sew. It sorta worked, I guess. Let's say it worked enough to do the sewing, but not so much that I would do it again. I need a better method to mark the line on fleece! Once I'd drawn in the line, I placed the airplane and stood back to make sure it looked like I wanted it to.
I brought it back to the machine and got completely tangled up in the fleece trying to find the starting point of the line. The puppy thought this was hilarious and tried to make off with the blanket while I was fighting with it. (Thanks, Casey.)
I used a zigzag stitch 7mm across and made it fairly close together. I will confess the beginning of the line is a little funky, because I was messing with how close together the zigzag was. In the end, however, I got it right and it went pretty smoothly. I even used my machine on the high speed setting for the first time! I felt magic. And there were only a few moment when I panicked because I couldn't find the line too.
Once the line was done, I placed the plane and basted it down with dark thread. I used the white thread to applique around the edge. (Can I just mention that I LOVE my new sewing machine?!)
And then it was done!
And there we go - my second fully successful project. In fact, so successful one of my friends has asked me to make him a more manly version for his couch. Since my dog steals his blanket every time we come over, I think that seems only fair! I guess that gives me a chance to remember things like folded edges on the applique too. I am scheming presents for more people already....
But anyway, hooray success!
A
Subscribe to:
Posts (Atom)